Install Postfix, Dovecot and Roundcube
Postfix is a Mail Transfer Agent (MTA) for routing and delivering electronic mail. Dovecot is a secure IMAP and POP3 Mail Delivery Agent (MDA). These two open-source applications work well with Roundcube, an email client primarily famous for its clever use of Ajax technology. In this guide, you'll install Postfix, Dovecot, and Roundcube on Ubuntu 20.04.
This guide uses the domain example.com and the server name mail.example.com.
Prerequisites
Before you begin, make sure you have the following:
- An Ubuntu 20.04 server configured with a Fully Qualified Domain Name (FQDN)
- A non-root user with sudo privileges
- A LAMP stack with Let's Encrypt SSL certificate installed
Install and Configure Postfix
Install the Postfix server by running the command below
$ sudo apt update -y
$ sudo apt install -y postfix
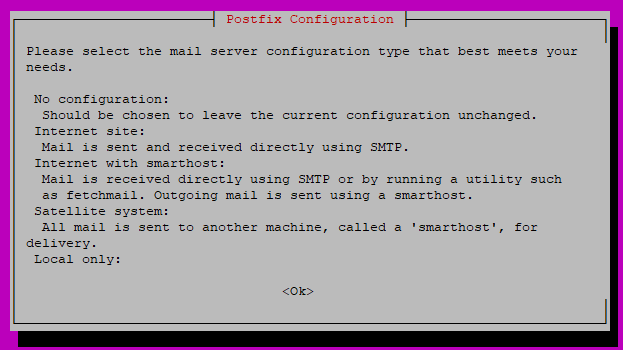
You'll get the Postfix configuration screen, as shown below. Press TAB and ENTER to continue.
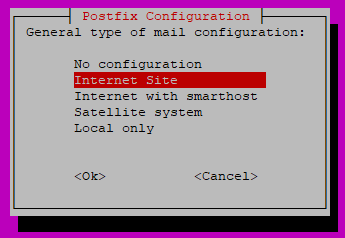
On the next screen, select Internet Site, then TAB and ENTER.
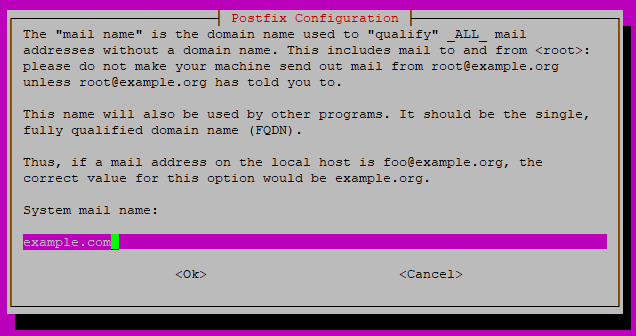
Enter the system mail name, which is your domain name. For instance, the server name is mail.example.com, so you'll enter example.com here.
Back up the the /etc/postfix/main.cf file, and create a new one:
$ sudo mv /etc/postfix/main.cf /etc/postfix/main.cf.bk
$ sudo vim /etc/postfix/main.cf
Enter the information below to the new file. Replace example.com with your domain name throughout the file. Make sure the value of smtpd_tls_cert_file and smtpd_tls_key_file point to your SSL certificate, as previously installed by Let's Encrypt.
smtpd_banner = $myhostname ESMTP $mail_name
biff = no
append_dot_mydomain = no
readme_directory = no

# TLS parameters
smtp_use_tls = yes
smtp_tls_security_level = may
smtp_tls_session_cache_database = btree:${data_directory}/smtp_scache

smtpd_use_tls = yes
smtpd_tls_security_level = may
smtpd_tls_session_cache_database = btree:${data_directory}/smtpd_scache
smtpd_tls_cert_file = /etc/letsencrypt/live/example.com/fullchain.pem
smtpd_tls_key_file = /etc/letsencrypt/live/example.com/privkey.pem
smtpd_relay_restrictions = permit_mynetworks, permit_sasl_authenticated,  reject_unauth_destination

smtpd_sasl_auth_enable = yes
smtpd_sasl_type = dovecot
smtpd_sasl_path = private/auth

virtual_transport = lmtp:unix:private/dovecot-lmtp
virtual_mailbox_domains = /etc/postfix/virtual_mailbox_domains

myhostname = mail.example.com
myorigin = /etc/mailname
mydestination =  localhost.$mydomain, localhost
relayhost =
mynetworks = 127.0.0.0/8 [::ffff:127.0.0.0]/104 [::1]/128
mailbox_size_limit = 0
recipient_delimiter = +
inet_interfaces = all
inet_protocols = all
alias_maps = hash:/etc/aliases
alias_database = hash:/etc/aliases
Save and close the file.
Create Virtual Mail Box Domains
The main.cf configuration file instructs Postfix to look for email domains in the /etc/postfix/virtual_mailbox_domains file. Create the file:
$ sudo vim /etc/postfix/virtual_mailbox_domains
Add the information below to the file and replace example.com with your domain name.
example.com #domain
Use the postmap command to change /etc/postfix/virtual_mailbox_domains to a format recognizable by Postfix. Run this command every time you edit the file - for instance, after adding additional domains to the file:
$ sudo postmap /etc/postfix/virtual_mailbox_domains
Edit the /etc/postfix/master.cf configuration file to enable the SMTP service:
$ sudo vim /etc/postfix/master.cf
Find the entry below:
...
#submission inet n       -       y       -       -       smtpd
...
and uncomment it:
...
submission inet n       -       y       -       -       smtpd
...
Save and close the file.
Install & Configure Dovecot
Install Dovecot and all dependency packages required to run the imap, pop3, and lmtp service:
$ sudo apt install -y dovecot-core dovecot-imapd dovecot-pop3d dovecot-lmtpd
Edit the /etc/dovecot/conf.d/10-mail.conf file to instruct Dovecot on the directory to look for mails:
$ sudo vim /etc/dovecot/conf.d/10-mail.conf
Find the entry below:
mail_location = mbox:~/mail:INBOX=/var/mail/%u
and change it to:
mail_location = maildir:/var/mail/vhosts/%d/%n
Save and close the file. The %d represents the domain, and %n represents the users. This means that you'll need to create a sub-directory in the /var/mail/vhosts for each domain receiving emails on your server.
Create the first sub-directory and replace example.com with your domain name.
$ sudo mkdir -p /var/mail/vhosts/example.com
Repeat the command above for every other domain that you want to receive emails for in your server while replacing example.com with the domain name. For instance, if you also intend to receive emails for the example.net domain, run the command below:
$ sudo mkdir -p /var/mail/vhosts/example.net
Create a vmail user and group for the Dovecot service:
$ sudo groupadd -g 5000 vmail
$ sudo useradd -r -g vmail -u 5000 vmail -d /var/mail/vhosts -c "virtual mail user"
$ sudo chown -R vmail:vmail /var/mail/vhosts/
Edit the Dovecot 10-master.conf file:
sudo vim /etc/dovecot/conf.d/10-master.conf
Locate the entries below:
...
inet_listener imaps {
  #port = 993
  #ssl = yes
}
...
Uncomment the port and ssl entries, as shown below, to allow Dovecot to use port 993 and SSL for secure IMAP:
...
inet_listener imaps {
  port = 993
  ssl = yes
}
...
Locate the entries below:
...
inet_listener pop3s {
  #port = 995
  #ssl = yes
}
...
Uncomment the port = 995 and ssl = yes lines:
...
inet_listener pop3s {
  port = 995
  ssl = yes
}
...
Locate the below section to enable the lmtp service:
...
service lmtp {
  unix_listener lmtp {
    #mode = 0666
  }

  # Create inet listener only if you can't use the above UNIX socket
  #inet_listener lmtp {
    # Avoid making LMTP visible for the entire internet
    #address =
    #port =
  #}
}
...
and change the configuration to:
...
service lmtp {
  unix_listener /var/spool/postfix/private/dovecot-lmtp {
    mode = 0600
    user = postfix
    group = postfix
  }
}
...
Locate the Dovecot authentication socket configurations below:
...
# Postfix smtp-auth
#unix_listener /var/spool/postfix/private/auth {
#  mode = 0666
#}
...
and change the configuration to:
...
#Postfix smtp-auth
unix_listener /var/spool/postfix/private/auth {
  mode = 0666
  user = postfix
  group = postfix
}
...
Save and close the file.
Configure Dovecot to use secure authentication. Edit the Dovecot 10-auth.conf file:
$ sudo vim /etc/dovecot/conf.d/10-auth.conf
Find the entry below:
# disable_plaintext_auth = yes
and uncomment it:
disable_plaintext_auth = yes
Find the entry below:
auth_mechanisms = plain
Change the authentication mechanisms from plain to plain login:
auth_mechanisms = plain login
Disable the Dovecot default authentication behavior that requires users to have a system account to use the email service. Find the line:
!include auth-system.conf.ext
and comment it out:
#!include auth-system.conf.ext
Find the line:
#!include auth-passwdfile.conf.ext
and uncomment it to enable Dovecot to use a password file:
!include auth-passwdfile.conf.ext
Save and close the file.
Edit the Dovecot password file auth-passwdfile.conf.ext:
$ sudo vim /etc/dovecot/conf.d/auth-passwdfile.conf.ext
The file looks similar to the one shown below:
passdb {
  driver = passwd-file
  args = scheme=CRYPT username_format=%u /etc/dovecot/users
}

userdb {
  driver = passwd-file
  args = username_format=%u /etc/dovecot/users
...
}
Make the changes to the file, as shown below:
passdb {
    driver = passwd-file
    args = scheme=PLAIN username_format=%u /etc/dovecot/dovecot-users
}

userdb {
    driver = static
    args = uid=vmail gid=vmail home=/var/mail/vhosts/%d/%n
}
Save and close the file.
Create the /etc/dovecot/dovecot-users password file, a plain text database that holds email users on your server:
$ sudo vim /etc/dovecot/dovecot-users
Add the email users by following the format below. Replace EXAMPLE_PASSWORD with a strong password. Also, replace example.com with your domain name:
admin@example.com:{plain}EXAMPLE_PASSWORD
info@example.com:{plain}EXAMPLE_PASSWORD
billing@example.com:{plain}EXAMPLE_PASSWORD
Save and close the file.
Configure Dovecot to Use the SSL Certificate. Open the /etc/dovecot/conf.d/10-ssl.conf file:
$ sudo vim /etc/dovecot/conf.d/10-ssl.conf
Find the line:
ssl = yes
Change the ssl value from yes to required:
ssl = required
Locate the two entries below:
#ssl_cert = </etc/dovecot/dovecot.pem
#ssl_key = </etc/dovecot/private/dovecot.pem
and change the two entries above and make sure they are pointing to the SSL certificate for your domain. For instance, if you are using the Let's Encrypt certificate, your entries will be similar to those shown below. Replace example.com with your domain name.
ssl_cert = </etc/letsencrypt/live/example.com/fullchain.pem
ssl_key = </etc/letsencrypt/live/example.com/privkey.pem
Save and close the file.
Restart the Postfix and Dovecot services to use the new settings:
$ sudo service postfix restart
$ sudo service dovecot restart
Install & Configure Roundcube
Install Roundcube webmail client:
$ sudo apt install -y roundcube
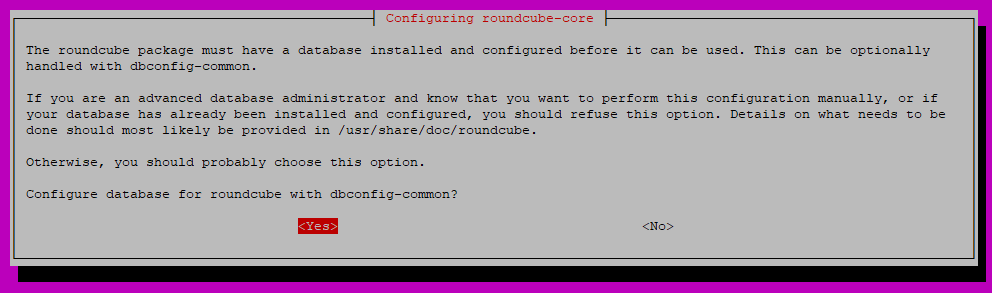
Press ENTER to configure the database for use with Roundcube:
On the next screen, enter a MySQL password to use with Roundcube:
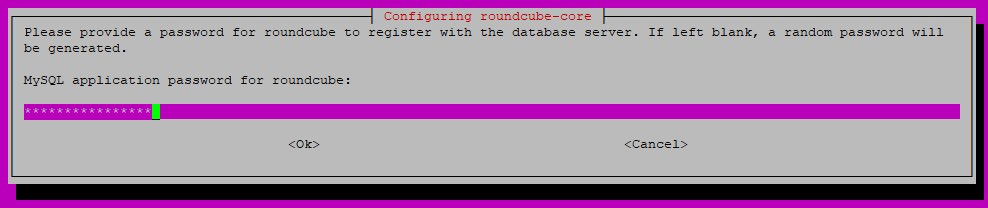
Press TAB and ENTER.
Repeat the same password then hit TAB and ENTER to continue.
Open your website SSL configuration file from the /etc/apache2/sites-enabled directory. Run the command below and replace example.com with your domain name:
$ sudo vim /etc/apache2/sites-enabled/example.com-le-ssl.conf
Your website configuration file will be similar to the one shown below:
...
<VirtualHost *:443>
    ServerAdmin admin@franktek.space
    ServerName franktek.space
...
</VirtualHost>
...
Add the entry Alias /mail /usr/share/roundcube after the entry ServerName example.com as shown below:
...
<VirtualHost *:443>
    ServerAdmin admin@example.com
    ServerName example.com
   Alias /mail /usr/share/roundcube
...
</VirtualHost>
...
Save and close the file.
Restart Apache.
$ sudo service apache2 restart
Test the Email Service
To login to the email server using Roundcube, enter the URL shown below and replace example.com with your domain name:
https://mail.example.com/mail
You should see a screen similar to the one shown below. Enter the username and password you defined in the Dovecot password file, and log in.