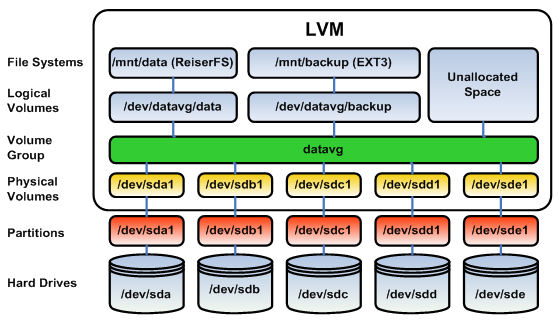
LVM
LVM stands for Logical Volume Manager, a mechanism that provides an alternative method of managing storage systems than the traditional partition-based one. In LVM, instead of creating partitions, you create logical volumes, and then you can just as easily mount those volumes in your filesystem as you'd a disk partition.
One exception to the previous statement is that you can not use logical volumes for /boot. That is because GRUB (the most common bootloader for Linux) can't read from logical volumes. The well-known alternative to GRUB, systemd-boot on the other hand reads only vfat filesystems, so that's not going to work either.
Components of LVM
There are three main components to LVM:
- Physical Volumes
- Volume Groups
- Logical Volumes
The main advantage of LVM is how easy it is to resize a logical volume or volume group. It abstracts away all the ugly parts (partitions, raw disks) and leaves us with a central storage pool to work with.
If you've ever experienced the horror of partition resizing, you'd wanna use LVM.
Configure LVM
LVM Installation
Install Ubuntu with encrypted LVM using your main hard drive (assumed /dev/sda).
Layer 1: Hard Drives, Partitions, Physical Volumes
Hard Drives
Start with disk scan to review available disks:
sudo lvmdiskscan
Partitions
If your secondary hard drive (/dev/sdb) is blank, create a full sized partition on it (/dev/sdb1).
Do another lvmdiskscan and you'll see the /dev/sdb1 partition listed as well (if it wasn't already there before).
Physical Volumes
Using pvscan you'll see all your physical volumes:
sudo pvscan
Create a new physical volume for your /dev/sdb1 partition:
sudo pvcreate /dev/sdb1

root@gerbil:/home/dwebb# pvcreate /dev/sdb1
WARNING: ext4 signature detected on /dev/sdb1 at offset 1080. Wipe it? [y/n]: y
  Wiping ext4 signature on /dev/sdb1.
  Physical volume "/dev/sdb1" successfully created.
WARNING: If you wish to preserve the content of /dev/sdb1, type n when prompted to wipe the disk.
Layer 2: Volume Groups
Now we need to add the new Physical Volume to the Volume Group.
List your Volume Groups using vgscan:
vgscan

Found volume group "vgubuntu" using metadata type lvm2
Add the new Physical Volume to the Volume Group using vgextend:
vgextend vgubuntu /dev/sdb1

Volume group "vgubuntu" successfully extended
Now let's check out the current status of the Volume Group:
vgdisplay vgubuntu

--- Volume group ---
VG Name               vgubuntu
System ID
Format                lvm2
Metadata Areas        2
Metadata Sequence No  4
VG Access             read/write
VG Status             resizable
MAX LV                0
Cur LV                2
Open LV               2
Max PV                0
Cur PV                2
Act PV                2
VG Size               267.05 GiB
PE Size               4.00 MiB
Total PE              68366
Alloc PE / Size       30207 / <118.00 GiB
Free  PE / Size       38159 / <149.06 GiB
VG UUID               1vlT1S-hr1t-NWXg-5EWR-m5dp-mSnu-wuvWvW
Layer 3: Logical Volumes, File Systems
Logical Volumes
Scan the current Logical Volumes with lvscan:
lvscan

ACTIVE            '/dev/vgubuntu/root' [117.04 GiB] inherit
ACTIVE            '/dev/vgubuntu/swap_1' [976.00 MiB] inherit
Create a New Logical Volume
Create a new Logical Volume using lvcreate:
lvcreate -L 149G vgubuntu

Logical volume "lvol0" created.
Scan the current Logical Volumes with lvscan:
lvscan

ACTIVE            '/dev/vgubuntu/root' [117.04 GiB] inherit
ACTIVE            '/dev/vgubuntu/swap_1' [976.00 MiB] inherit
ACTIVE            '/dev/vgubuntu/lvol0' [149.00 GiB] inherit
Extend an Existing Logical Volume
Alternatively, extend an existing logical volume with the newly created unallocated space using lvextend:
lvextend -l +100%FREE /dev/vgubuntu/root
Using df -h you will see that the filesystem size hasn't changed yet.
To update the filesystem (with ext4 you can do this on the fly), use the resize2fs:
resize2fs /dev/vgubuntu/root
LVM Commands
PV – Physical Volume VG – Volume Group LV – Logical Volume
Layer 1: Hard Drives, Partitions, Physical Volumes
lvmdiskscan – System readout of volumes and partitions
pvdisplay – Display detailed info on physical volumes
pvscan – Display disks with physical volumes
pvcreate /dev/sda1 – Create a physical volume from sda1
pvchange -x n /dev/sda1 – Disallow using a disk partition
pvresize /dev/sda1 – Resize sda1 PV to use all of the partition
pvresize --setphysicalvolumesize 140G /dev/sda1 – Resize sda1 to 140GB
pvmove /dev/sda1 – Move data out of sda1 to other PVs in VG
(Note: Free disk space equivalent to data moved is needed elsewhere)
pvremove /dev/sda1 – Delete Physical Volume
LVM Layer 2 – Volume Groups
vgcreate vg1 /dev/sda1 /dev/sdb1 – Create a volume group from two drives
vgextend vg1 /dev/sdb1 – Add PV to the volume group
vgdisplay vg1 – Display details on a volume group
vgscan – List volume groups
vgreduce vg1 /dev/sda1 – Removes the drive from vg1
(Note: use pvmove /dev/sda1 before removing the drive from vg1)
vgchange – Activate/deactivate Volume Groups and change perameteres
vgremove vg1 – Remove volume group vg1
vgsplit and vgmerge - Split and merge volume groups
vgrename – Renames a Volume Group
LVM Layer 3 – Logical Volumes, File Systems
lvcreate -L 10G vg1 – Create a 10GB logical volume on Volume Group vg1
lvchange and lvreduce - Typically not used
lvrename – Rename Logical Volume
lvremove – Removes a Logical Volume
lvscan – Shows Logical Volumes
lvdisplay – Shows details on Logical Volumes
lvextend -l +100%FREE /dev/vg1/lv1 – Extend Logical Volume lv1 that takes up ALL of the remaining free space on the Volume Group vg1
resize2fs /dev/vg1/lv1 – Resize the file system to the size of the logical volume lv1